I know the frustration. You finally generate a character in Midjourney that you absolutely love. The face, the vibe, it’s all perfect. Then you try to put them in a different scene, and suddenly they look like a distant, slightly-off cousin. The consistency is gone. It’s one of the biggest hurdles in using AI art for any kind of storytelling or project.
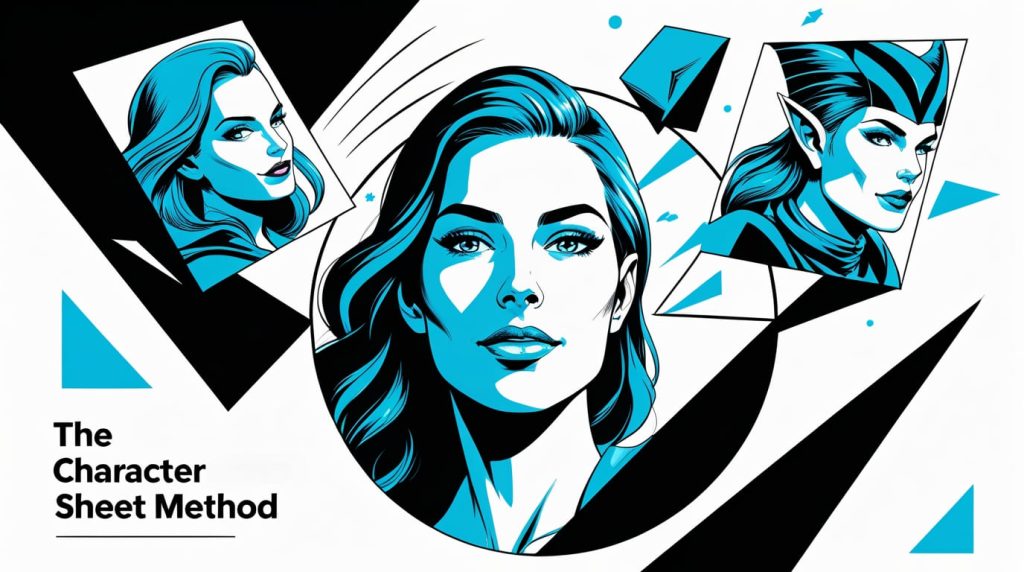
After weeks of testing, I realized the common advice was missing a key step. The solution isn’t just about using the –cref tag; it’s about giving Midjourney a rock-solid foundation to work from. I call it the “Character Sheet Method,” and it’s how I get perfectly consistent characters every single time.
- The Core Idea: Stop using a single, random image as your character reference. Instead, create a simple “Character Sheet” with 3 key angles first.
- The Magic Parameter: The –cref (Character Reference) command is your main tool. You’ll point it to the URLs of your character sheet images.
- My Key Tip: Use the /prefer option set command to save your character sheet URLs to a simple shortcut. This saves you an insane amount of time.
- For Changing Clothes: Set the Character Weight parameter to zero (–cw 0) and describe the new outfit in your prompt. This tells Midjourney to only keep the face and change the rest.
The Big Problem: Why Your “Consistent” Characters Aren’t
If you’ve tried and failed to get consistent characters, I’m willing to bet it’s for one of two reasons.
First, you’re probably using a single, flawed reference image. Maybe the lighting is dramatic, the angle is weird, or part of the face is obscured. You’re forcing Midjourney to guess what the rest of your character looks like, and AI guesswork leads to inconsistency.

Second, you’re fighting Midjourney’s natural randomness instead of guiding it. Every time you roll the dice on a new prompt, you’re hoping for the best. The Character Sheet Method is about fixing the dice so they always land in your favor.
My Solution: The “Character Sheet” Method
This workflow is inspired by how professional artists and animators work. They create a “model sheet” or “character sheet” so everyone on the team knows exactly how a character looks from all angles. We’re going to do the same thing for the AI.
Step 1: Create Your “Base” Character.
Before anything else, we need our “source of truth.” This is the one image that defines the character. The key here is to keep the prompt simple and the result clean and neutral.
The prompt I use for a neutral, high-detail base character is straightforward. I avoid dramatic lighting or extreme expressions.
Prompt: a photorealistic portrait of a woman with freckles and brown hair, neutral expression, studio lighting, front-facing –ar 4:5 –v 6.0

From the grid, I pick the one that looks best and upscale it. This is our “Base Character.” Don’t overthink it, just pick the one with the clearest facial features.
Step 2: Build the Character Sheet.
Now, this is the core of the method. We will use our Base Character to generate three key images: a front view (which we already have), a 45-degree view, and a side profile.
- Click on your upscaled Base Character image and copy the image URL.
- Now, write a new prompt to create the other angles. For the 45-degree view, I used:Prompt: 45 degree angle portrait of a woman –cref [URL of your Base Character] –v 6.0
- Do the same for the side profile:Prompt: side profile portrait of a woman –cref [URL of your Base Character] –v 6.0
After a little tweaking, you’ll have your three essential images. This is your official Character Sheet.

Now, to make this easy to use, we’ll save these three URLs as a shortcut using /prefer option set. In Discord, type /prefer option set, give it a name (I’ll call mine “zara_sheet”), and in the “value” field, paste all three image URLs separated by a space.
Putting Your Character to the Test: The Fun Part
With our character sheet locked and loaded, we can now place our character, “Zara,” into any situation with incredible consistency.
Scenario 1: Changing Scenery & Poses
Let’s put Zara in a cyberpunk city. Because our shortcut –zara_sheet contains multiple angles, Midjourney has much more data to pull from, keeping her face stable even with complex backgrounds.
Prompt: a woman standing in the rain on a neon-lit cyberpunk street, cinematic –cref –zara_sheet –v 6.0

Scenario 2: Changing the Art Style (The –sref Combo)
This is where it gets really powerful. We can combine our character reference (–cref) with a style reference (–sref) to completely change the artistic medium. I took a screenshot from a classic comic book to use as a style reference.
My prompt for turning our photorealistic hero into a vintage comic book character was:
Prompt: a woman looking determined –cref –zara_sheet –sref [URL of comic book image] –v 6.0

Scenario 3: Changing the Outfit (The –cw Trick)
The Character Weight parameter (–cw) controls how much Midjourney clings to the reference image. The default is –cw 100, which copies the face, hair, and clothes.
But if you want to change the outfit, set the Character Weight to zero (–cw 0). This tells Midjourney: “Keep the face exactly the same, but feel free to change the clothes based on my new prompt.”
Prompt: a woman wearing a detailed armored knight’s breastplate, fantasy art –cref –zara_sheet –cw 0 –v 6.0

The Advanced Playbook: Common Problems & My Fixes
Even with this method, you can hit snags. Here are the most common issues I’ve run into and how I fix them.
Problem: “Midjourney is distorting my character’s face!”
- The Fix: This usually happens when your base reference image has weird lighting or isn’t a clean shot. Go back to Step 1 and generate a new base character with very simple, flat “studio lighting.” A clean reference is everything.
Problem: “How do I add a second consistent character?”
- The Fix: Don’t try to cram two –cref tags into one prompt. It usually ends in a mess of merged faces. The most reliable method I’ve found is to use the Vary (Region) tool. First, generate your scene with one character. Then, use Vary (Region) to select an area where you want the second character, and in the prompt box for that region, use the –cref tag for your second character.

Problem: “My character won’t hold the pose I want!”
- The Fix: If Midjourney is ignoring your pose description (e.g., “a person running”), you can force its hand. Find an image of the pose you want (it can be a photo, a sketch, anything) and use its URL as an image prompt at the very beginning of your prompt. This guides the composition, while –cref handles the character’s appearance.
So, what’s the bottom line?
The key to unlocking consistent characters in Midjourney V6 isn’t just knowing about –cref, it’s about adopting a more deliberate, structured workflow. By creating a simple character sheet with multiple angles first, you provide the AI with a robust set of data that dramatically reduces errors and inconsistencies.
This method takes a few extra minutes to set up at the beginning of a project, but it will save you hours of frustrating re-rolls down the line. It’s the difference between hoping for a good result and creating one on demand. 🙂
What has your experience been with character consistency? Share your wins and frustrations in the comments below